Management Interface
The groupios Management Interface is located under the manage subdomain of the system domain. This interface is designed to provide system and tenant administrators with all the necessary tools to effectively manage and configure the groupios environment.
Navigation Overview
The management interface features a user-friendly navigation menu located on the left side of the dashboard. Here’s a brief overview of the key sections and their subsections:
-
Dashboard: Provides a high-level overview of the system's current status and key metrics.
-
System:
- Domains: Manage domain configurations, including adding, modifying, and deleting domains.
- Certificates: Handle SSL/TLS certificates to ensure secure communication within the system.
- Users: Administer user accounts, including creating, updating, and removing users.
- User Federations: Configure and manage user federation settings for integrating external identity providers.
- Groups: Organize users into groups to enhance better mail coverage.
-
Roles: Define and manage roles to control access levels and permissions for different users.
-
Licenses: View and manage your groupios license, including details about active services, usage limits, and expiration dates.
-
Mailserver: Configure and monitor email gateway settings, ensuring efficient and secure email communication.
-
Tenants: Manage different tenants using the system, including their configurations and license resources.
-
Apps: View the ports used by the Extended Groupware Application and configure subdomains.
Dashboard
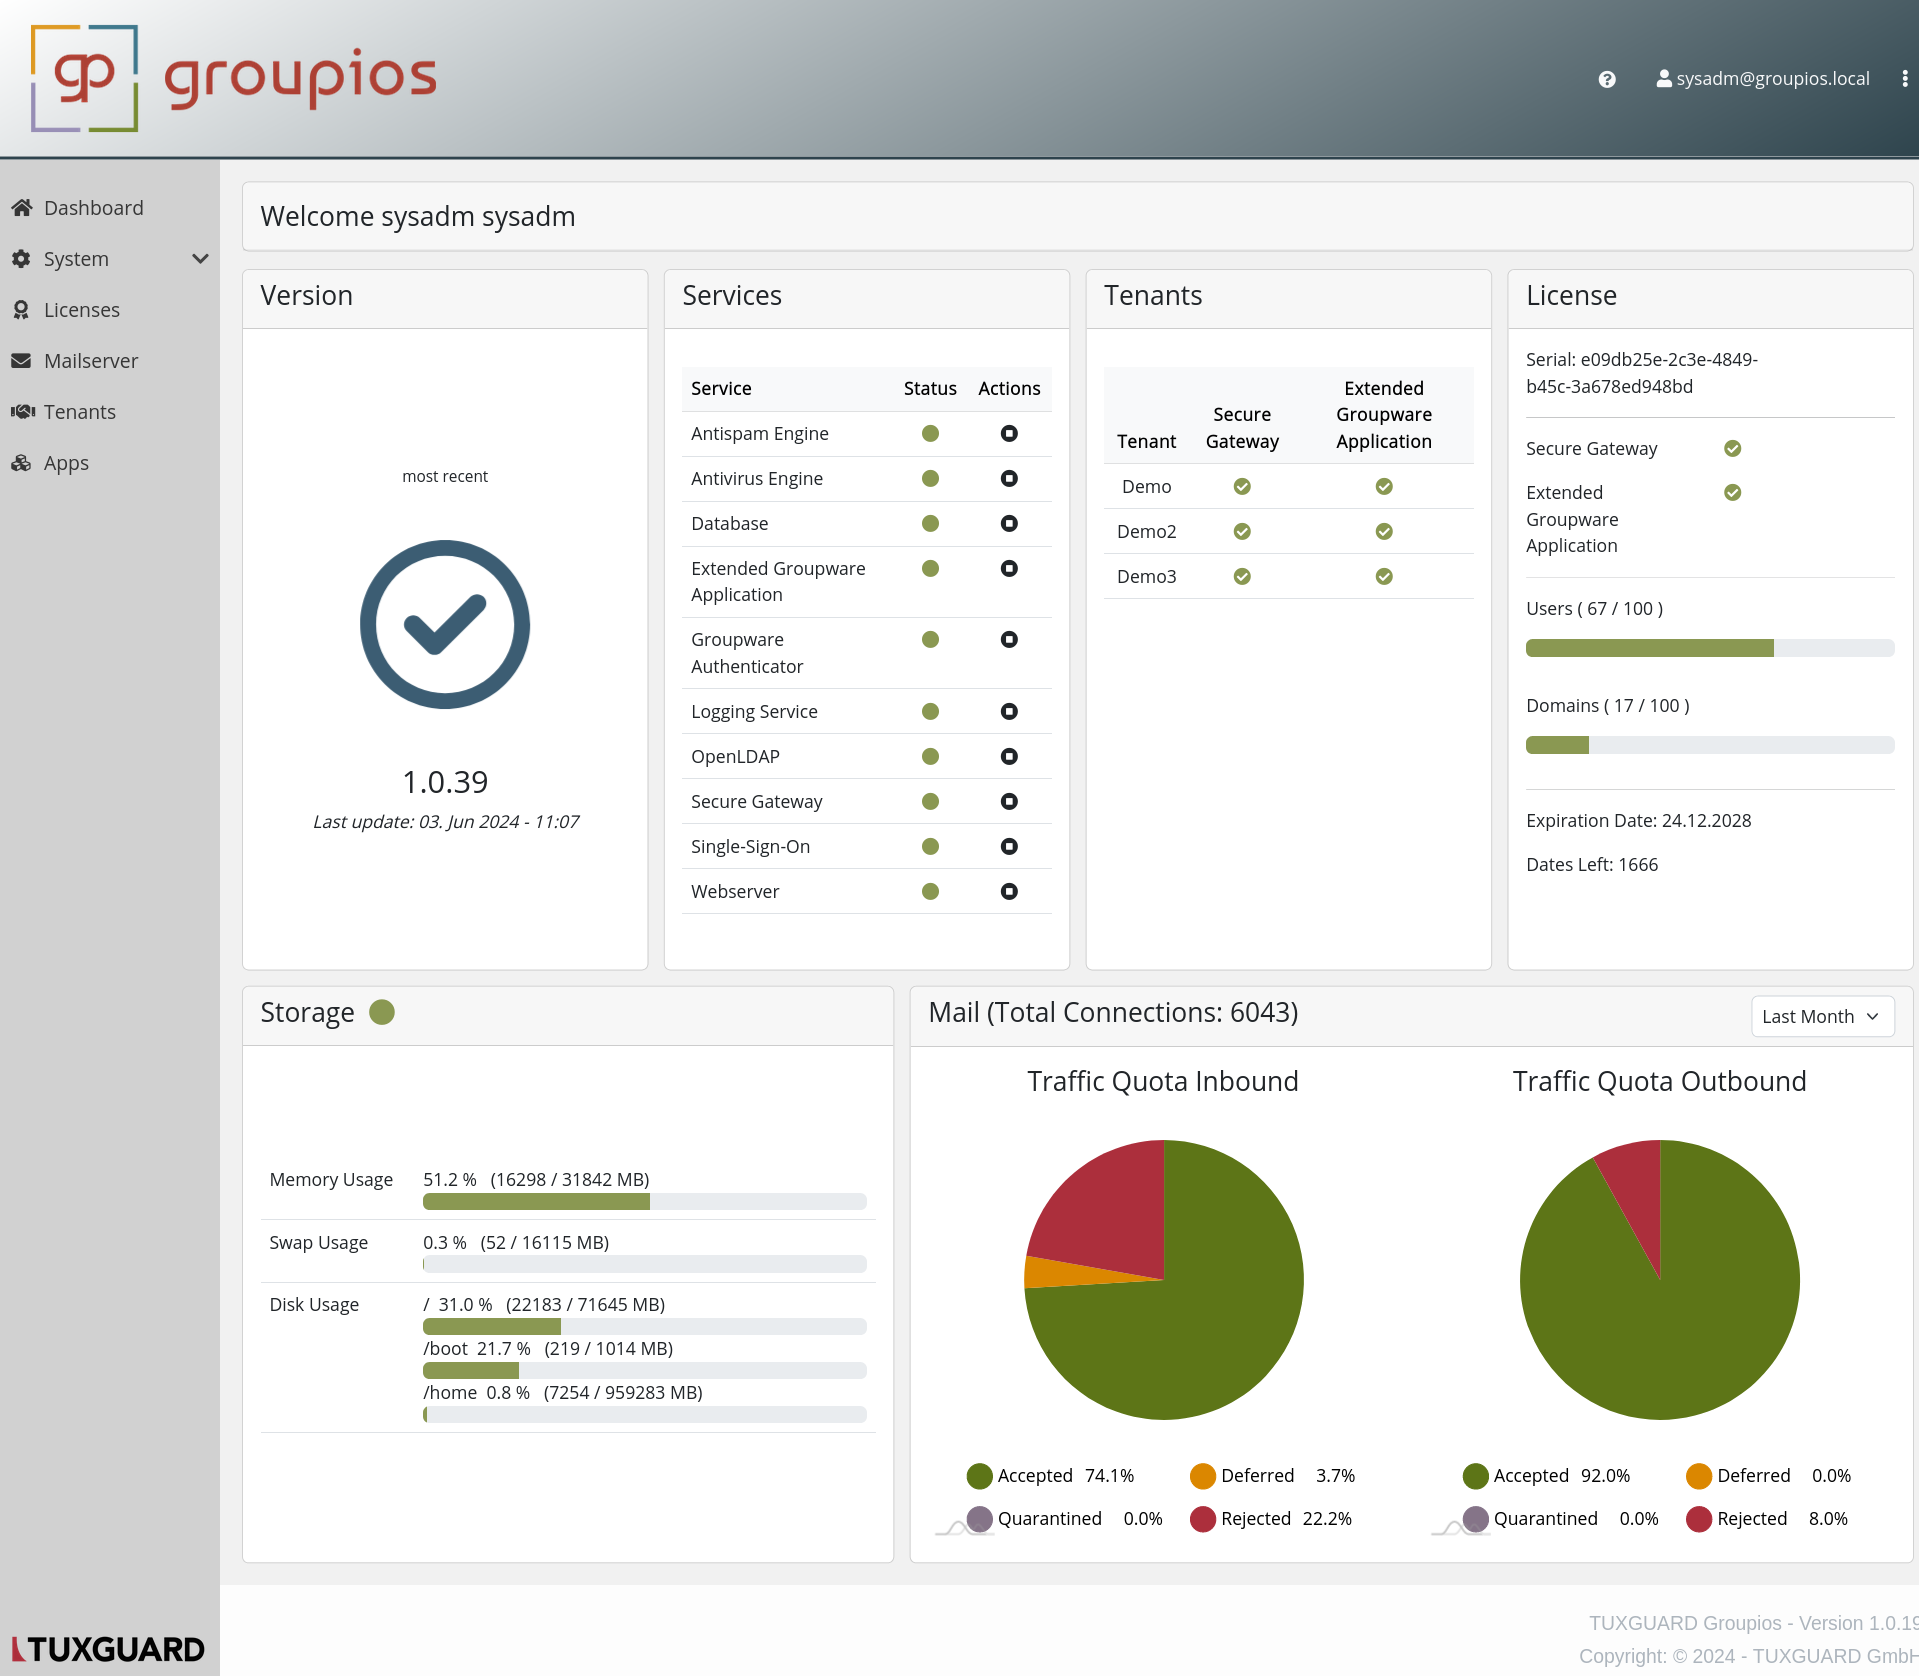
The dashboard provides a comprehensive overview of the system's status, including version information, service health, tenant management, license details, storage usage, and email traffic statistics. Below is a brief description of each section:
-
Version: Displays the current version of groupios and the timestamp of the last update.
-
Services: Lists all the critical services such as Antispam Engine, Antivirus Engine, Database, and more. Each service has a status indicator (green for active, red for inactive) and an action button for management tasks.
-
Tenants: Shows the tenants using the system along with their status for Secure Gateway and Extended Groupware Application services.
-
License: Provides details about the current license, including the serial number, active services, number of users and domains used versus the total allowed, expiration date, and days left until expiration.
-
Storage: Displays real-time usage statistics for memory, swap, and disk space, helping to monitor resource utilization.
-
Mail (Total Connections): Offers insights into mail traffic, showing total connections and traffic quota statistics for inbound and outbound emails, including accepted, deferred, quarantined, and rejected percentages.
This dashboard is designed to give system administrators a quick and efficient way to monitor and manage the groupios system, ensuring optimal performance and security.
System - Domains
The groupios Management Interface provides a robust system for managing domains. This section explains how to navigate and utilize the domain management features effectively.
Domains Table

The Domains section features a table listing all the domains currently configured in the system. This table allows administrators to view and manage existing domains at a glance.
Adding and Changing Domains
There are two primary actions available for domain management:
-
Connect New Domain:
- Click the "Connect New Domain" button to initiate the process of adding a new domain to the system.
- Follow the prompts to enter the necessary domain information.
-
Change System Domain:
- Click the "Change System Domain" button to change the primary system domain.
- Ensure that a certificate for the subdomains
manage,mail,smtp,gateway, andloginis provided under the System -> Certificates section before making this change.
Domain Connectivity
Connecting domains to the system allows the administrator to:
- Create users under these domains.
- Enable email services for these domains, ensuring that the system can send and receive emails.
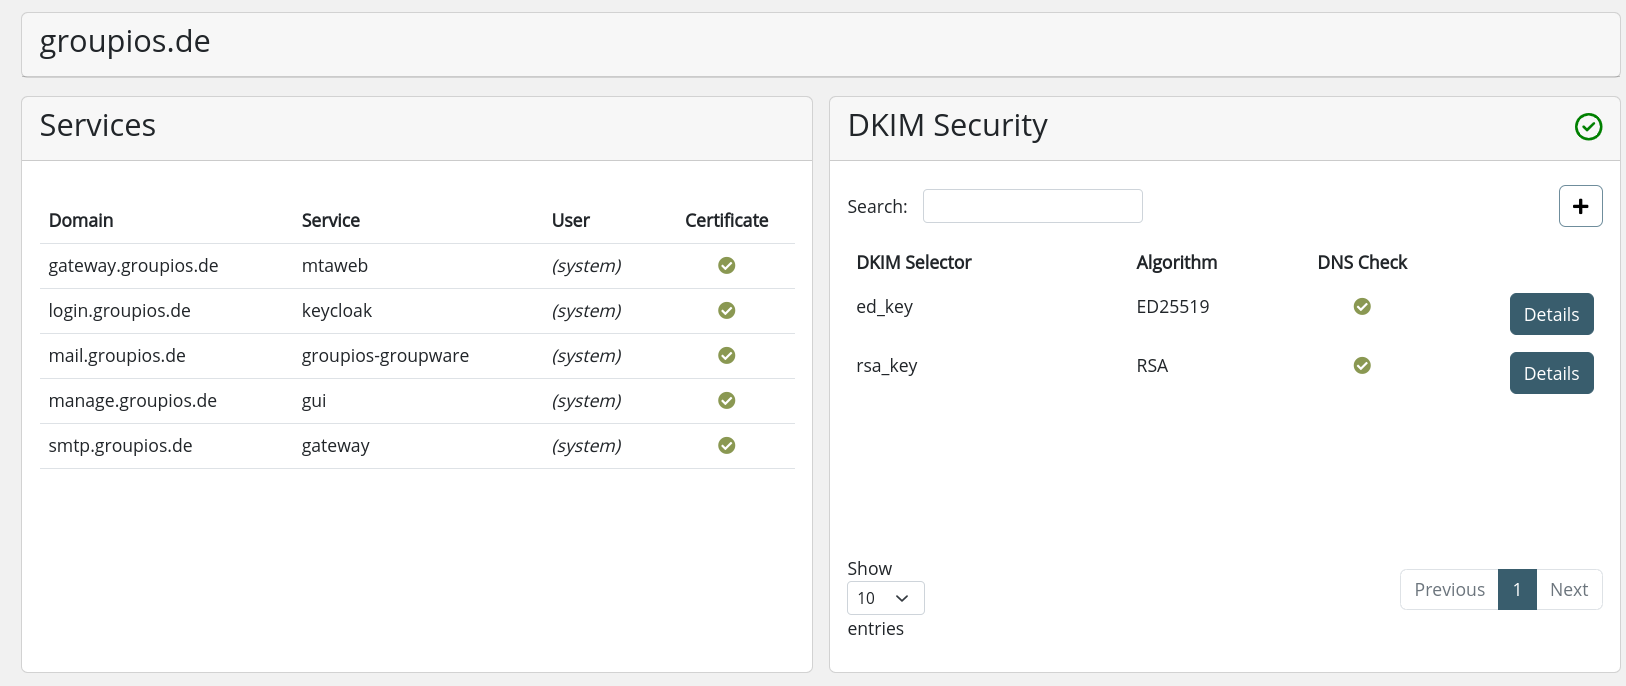
DKIM Verification

-
(1) DNS details can be found here.
-
(2) New DKIM keys with custom selectors can be added here.
-
(3) When a domain is selected, the system automatically checks for the presence of RSA and ED25519 DKIM (DomainKeys Identified Mail) keys. Both keys should be used for signing to maintain backward compatibility.
-
The details view provides the necessary DKIM key and the identifier for the TXT record that needs to be added to the domain's nameserver.
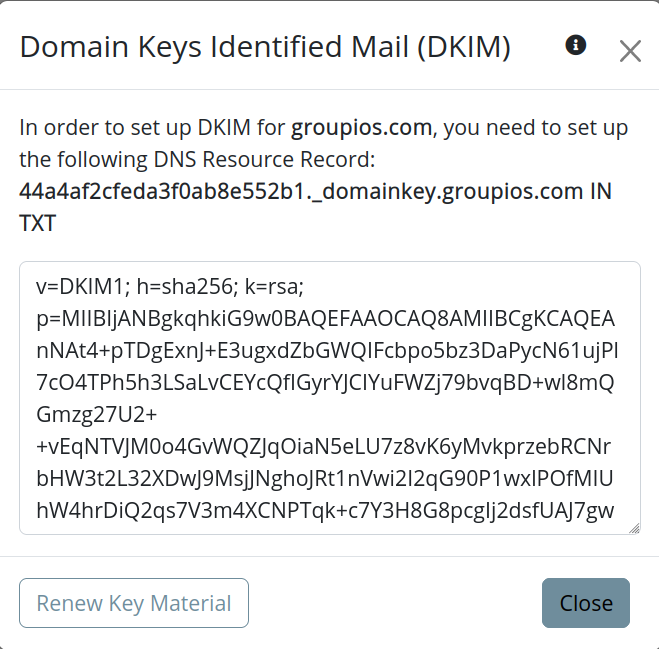
By ensuring that DKIM keys are correctly configured, the system helps maintain secure and authenticated email communication.
New key material will be used to sign new messages within 24 hours. You also can restart the Antispam Engine (rspamd) manually to speed up this process.
Note
Further domain specific mail configurations are performed under the domain section of the Secure Gateway Interface.
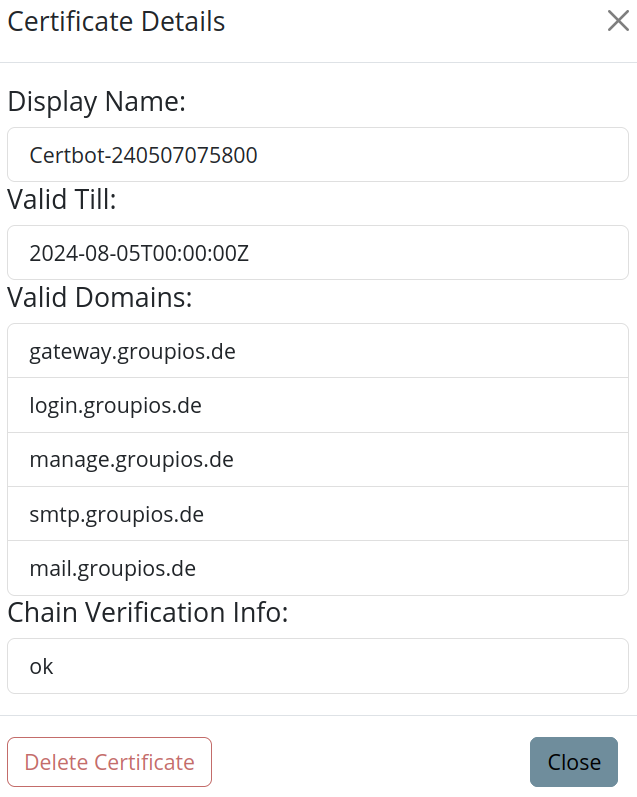
System - Certificates
The certificate management feature allows administrators to oversee and manage all uploaded or provided certificates within the system. Here's how to effectively utilize this functionality:
Overview
The certificate management view provides a comprehensive overview of all certificates currently in use. It displays key information such as the expiration date of each certificate.
Uploading Certificates
To upload a certificate:
- Click on the Upload Certificate button.
- Provide the certificate PEM and certificate key files as prompted.
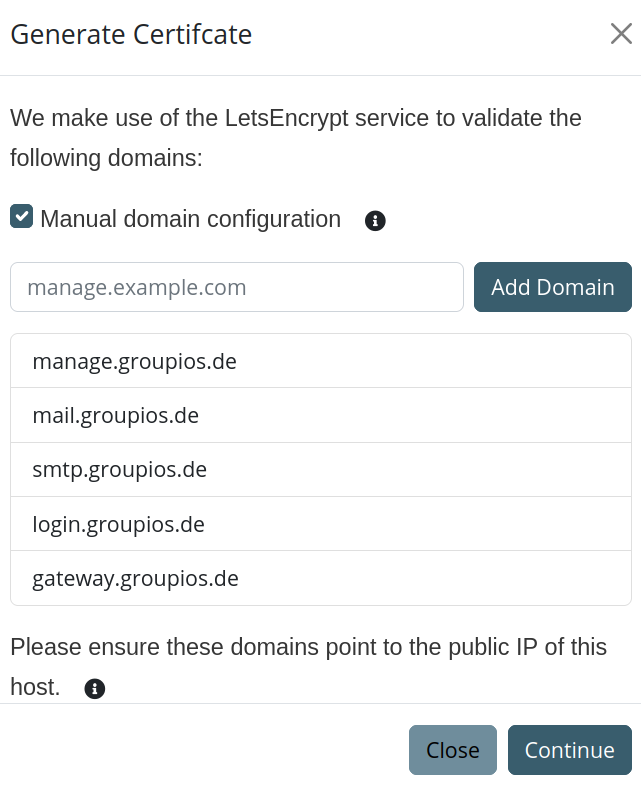
Generating Certificates with Let's Encrypt
To generate certificates using Let's Encrypt:
- Click on the Autogenerate Certificate button.
- Follow the prompts in the modal that appears, providing the necessary information:
- Specify the subdomains for which the certificate will be generated.
- Provide a contact email address.
- Approve the terms and conditions of Let's Encrypt.
Detailed Explanation
Upon clicking the detail button on a certificate row, a more detailed explanation about all associated subdomains is provided.
System - Users
The Users view provides a comprehensive table of all registered users in groupios. This view gives an overview of each user's information, including:
- Username: Always the primary email address of the user.
- Associated Roles: The roles assigned to the user.
- Extended Groupware Access: Whether the user has access to the Extended Groupware Application.
- User Federation: Whether the user originates from a user federation.
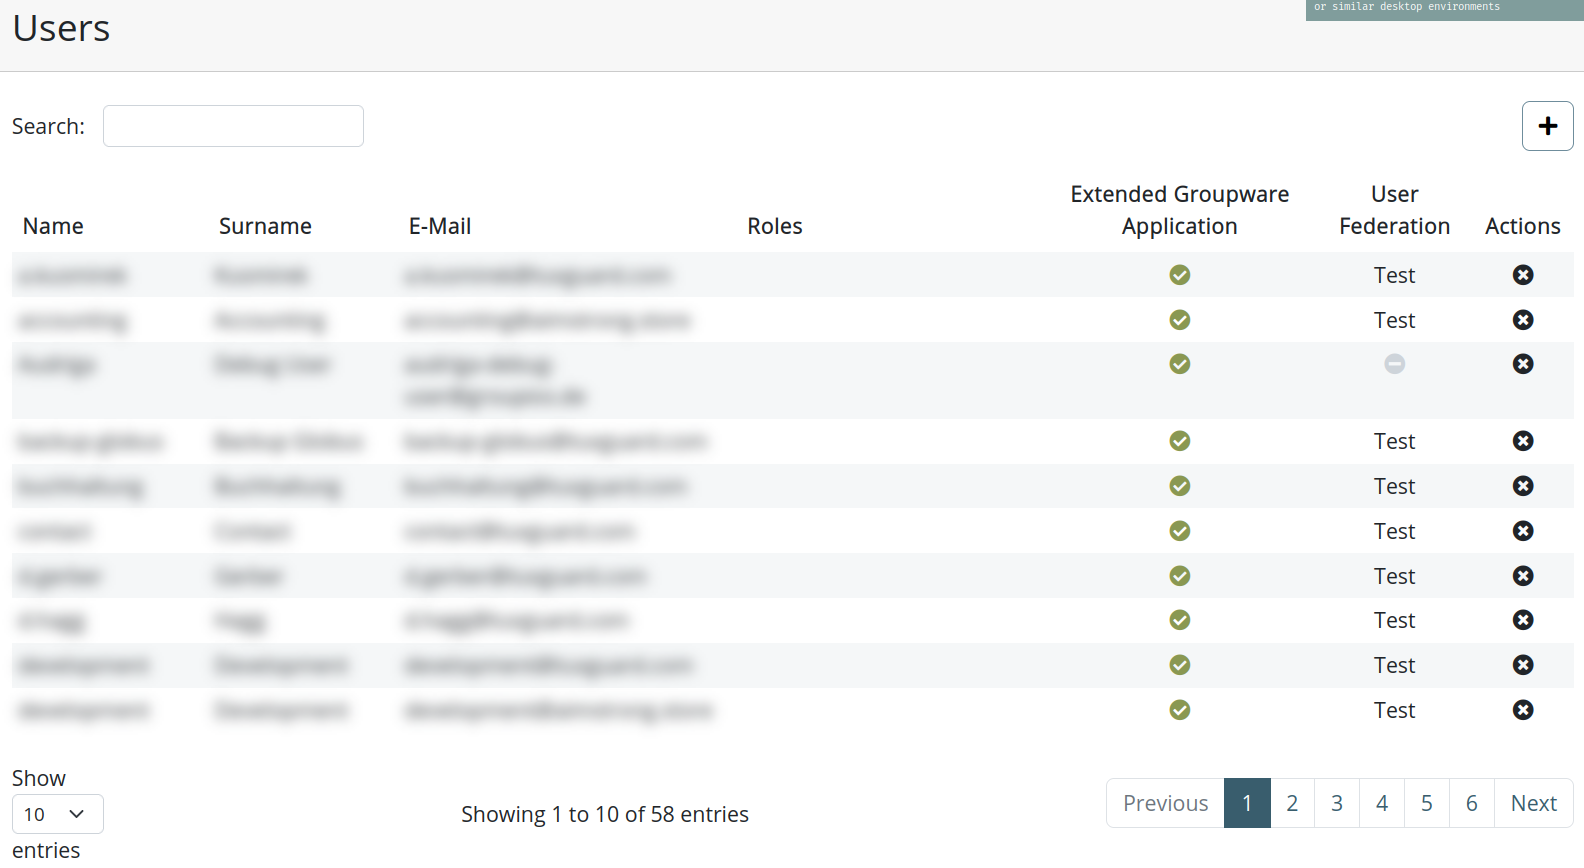
Adding a New User
To add a new user, use the + button.
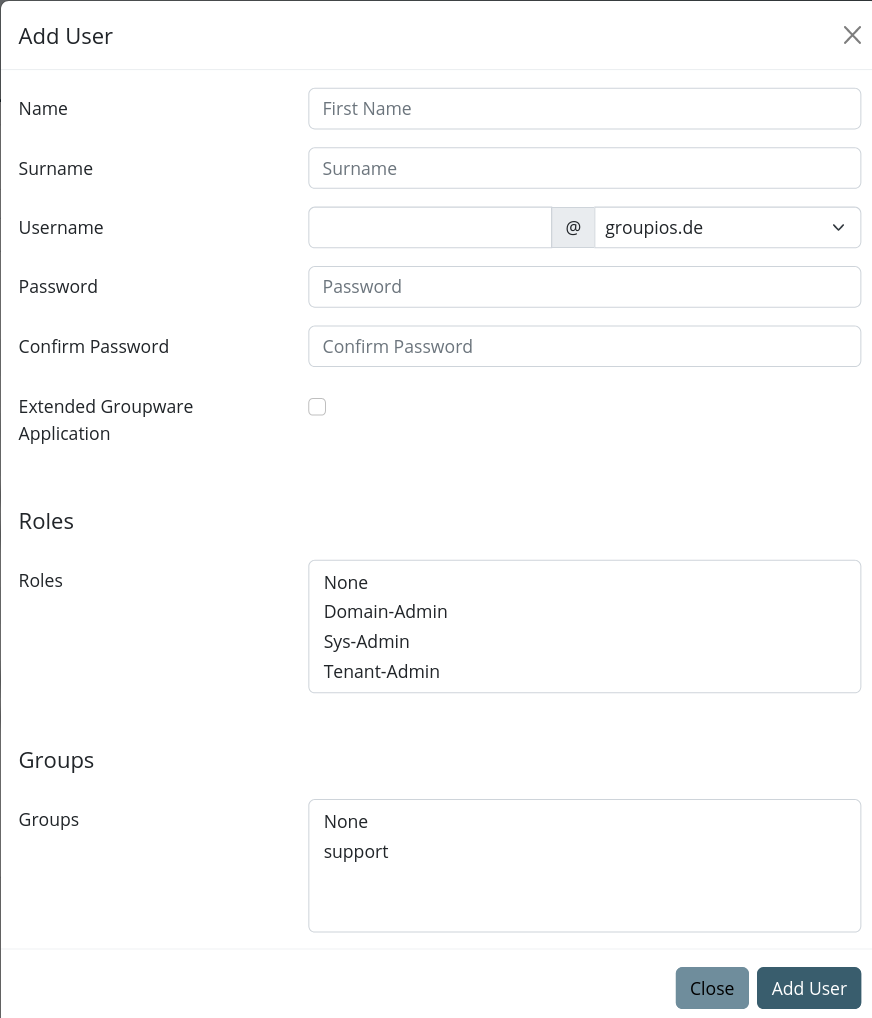
Note
When entering the username, a dropdown list of available domain names will appear. Note that while 'localhost' is included in this list, it should not be used as it may lead to inconsistencies.
Detailed User Information
By clicking on a user in the table, a more detailed view opens. In this detailed view, administrators can:
- Set Aliases: Assign or change aliases for the user.
- Edit User Information: Update the user's information.
- Edit Associated Roles: Modify the roles assigned to the user.

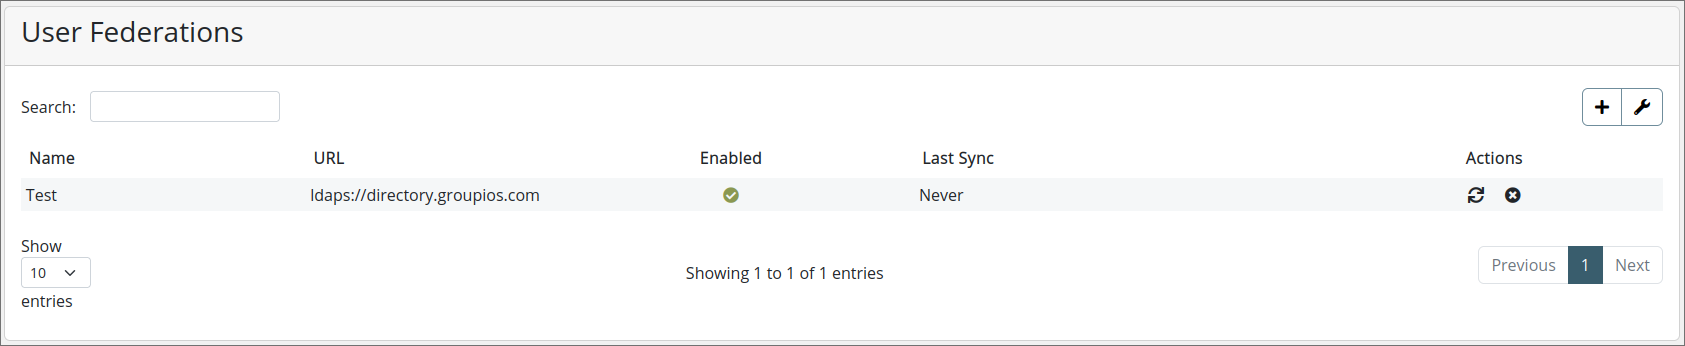
System - User Federations
User federations in groupios enable administrators to synchronize users via LDAP (Lightweight Directory Access Protocol) or AD (Active Directory) and relay authentication requests to these servers. This ensures that user credentials are managed and validated by the LDAP/AD servers directly. enhancing security by not storing passwords within groupios.
Note
Currently, any added user federation is synchronized automatically every 5 minutes. This interval is fixed and cannot be modified.
Key Features
- Synchronization: Import and synchronize user data from LDAP/AD servers.
- Authentication Relay: Forward authentication requests to LDAP/AD servers, ensuring passwords are not stored in groupios.
- Enhanced Security: Password validation occurs exclusively through LDAP/AD servers, reducing the risk of credential exposure.
Benefits
- Centralized User Management: Manage users centrally within LDAP/AD, streamlining administration.
- Improved Security: By not storing passwords in groupios, the risk of data breaches is minimized.
- Seamless Integration: Ensure smooth integration and operation with existing LDAP/AD infrastructure.
Setting Up User Federations
-
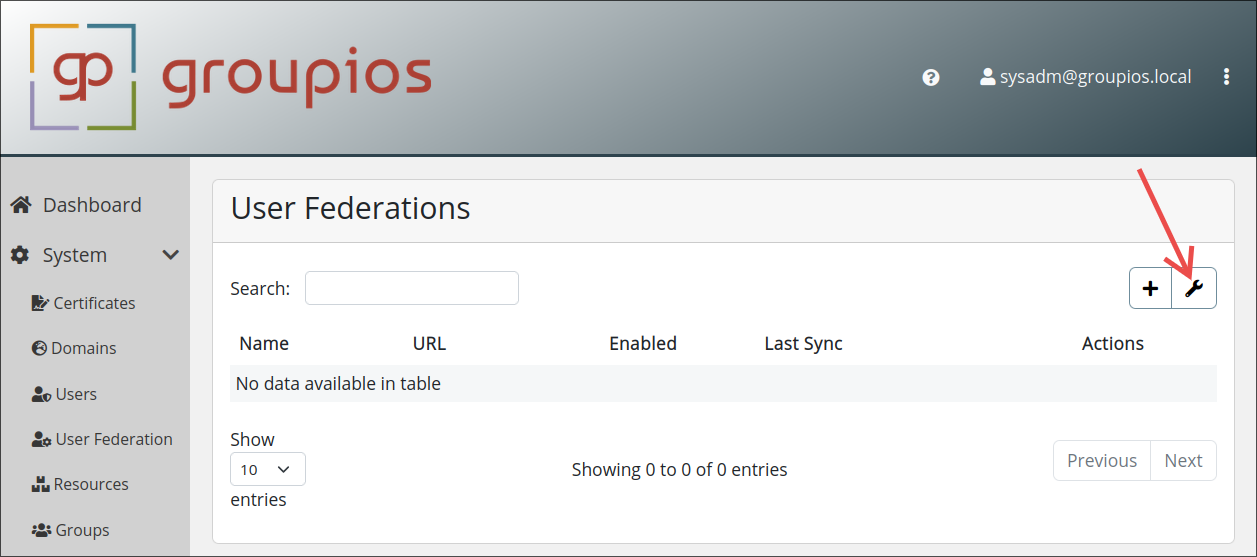
Access User Federations: Navigate to the User Federations section in the groupios admin console.
-
Add LDAP/AD Provider: Click on "+" and provide a name for the connection.
-
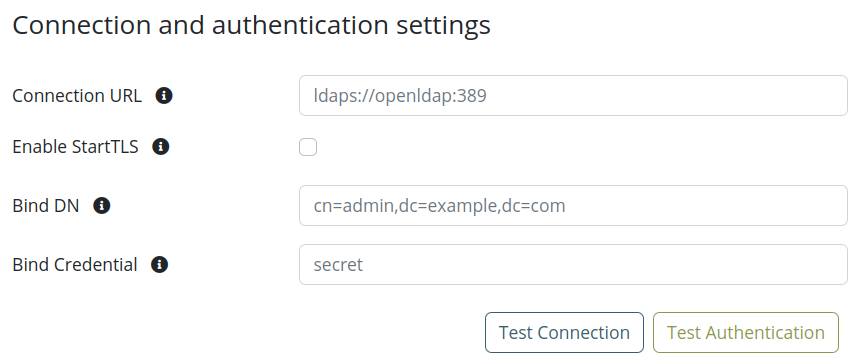
Configure Connection: Enter the connection details for your LDAP/AD server (e.g., server URL, port, and credentials).
-
Synchronization Settings: Configure synchronization settings such as users dn, user object classes, search scope and user attributes mapping.
-
Authentication Relay Setup: Ensure the authentication relay is properly configured to forward authentication requests to the LDAP/AD server.
-
Test Configuration: Test the connection and synchronization settings to ensure they work as expected.
-
Save and Apply: Save the configuration and apply the settings to activate the user federation.
Synchronizing User Federations
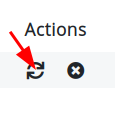
You can perform a synchronization manually by pressing the synchronization button.
Note
There are some limitations to user synchronization:
- The username attribute must map to a valid email address with a domain registered under System -> Domains. This prevents collisions with users in other tenants.
- If no connection can be established or the bind credentials are invalid, the user federation is automatically disabled.
Private TLS Certificates
This guide explains how to configure LDAP communication using certificates issued by a private Certificate Authority (CA). To ensure secure communication, these certificates need to be recognized by keycloak. Follow the steps below to add your private CA certificates to the truststore.
Steps to Add Private CA Certificates to the Truststore
-
Copy the CA Certificate:
- Place your private CA certificate file into the
/home/groupios/truststores/folder. - Example command:
scp /path/to/myCA.crt groupios@manage.example.com:/home/groupios/truststores/ - Place your private CA certificate file into the
-
Restart Services:
- After updating the truststore, restart keycloak to ensure it recognizes the new certificate. Either by manually entering
docker compose up -d --force-recreate keycloakor by using the command line tool
Services -> keycloak -> Restart
Verification
- Test the LDAP connection to ensure that it is working correctly and that the certificate is recognized.
- Use a tool like
ldapsearchor check application logs for any SSL/TLS related errors.
Troubleshooting
- If LDAP communication fails, verify that the certificate file has the correct permissions and is recognized by keycloak, this can be verified in the keycloak logs:
docker logs -f keycloak - Ensure that the certificate has not expired, containes as common name the hostname used for connection and that it is properly formatted (e.g., PEM format for most systems).
By following these steps, you can securely use private CA certificates for LDAP communication.
User Federation Settings
You can access the user federation settings by pressing the wrench symbol.
Following options are currently available:
- Automatically Disable Erroneous User Federations: User federations with erroneous settings might block the loading of users. This is a Keycloak issue. This option automatically disables a user federation when errors are identified.
- Synchronization Interval: This option specifies how often the users from a user federation are synchronized.
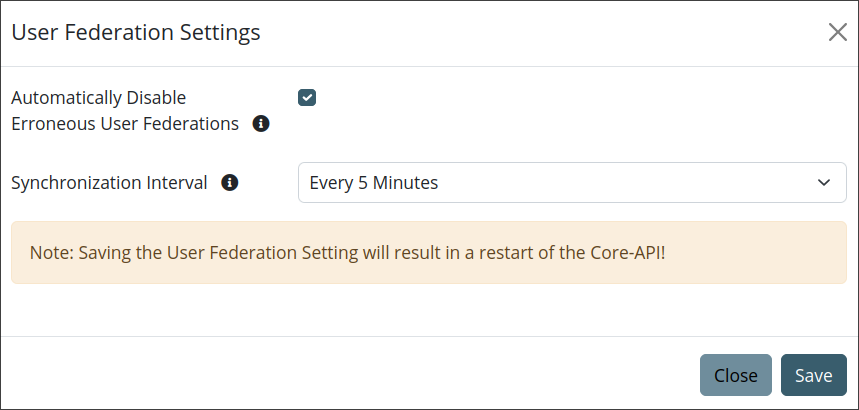
Warning
Saving the User Federation Setting will result in a restart of the Core-API!
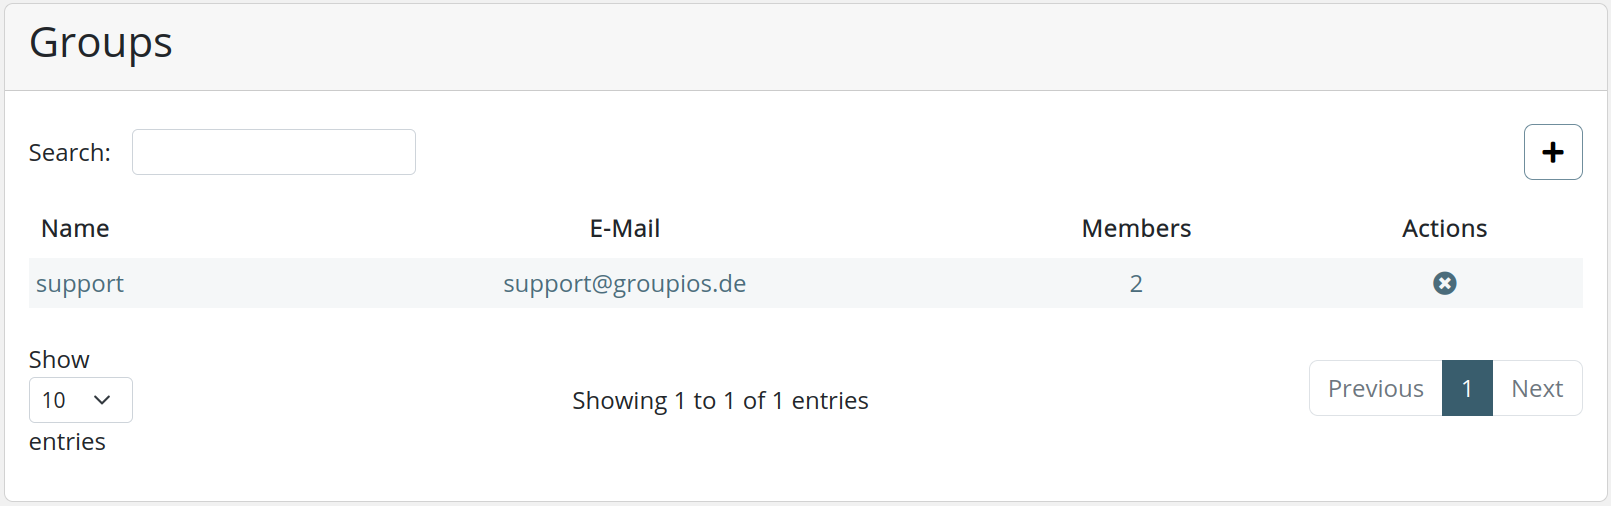
System - Groups
Mail groups let you easily send mails to a collection of people at once. You create a group with a name and add mail addresses to it. Then, whenever you send an mail to the group address, everyone in the group gets the same mail. This is useful for sending messages to teams, clubs, or any group of people who share a common interest.
The Groups view provides an overview of all created groups in groupios. Each group is assigned a unique mail address. This section outlines how to manage and utilize groups effectively.
Overview of Groups
The Groups view displays a table with the following information for each group:
- Group Name
- Email Address: The unique email address assigned to the group.
- Members: The amount of members belonging to the group.
Detailed Group Information
By clicking on a group in the overview table, a more detailed view opens. In this detailed view, administrators can:
- Edit Group Information: Update the group's display name.
- Manage Group Members: Add or remove users from the group.
Adding a New Group

To add a new group:
- Click on the Add Group button.
- Enter the group name and assign an email address.
- Add members to the group.
Note
Adding a user to a group also grants this user the permission to send mails from that group address.
System - Roles
The Roles view allows administrators to manage user roles within Groupios. This section outlines how to view, add, and edit roles, as well as configure access rights for each role.
Overview of Roles

The Roles view displays a list of all defined roles. From this view, administrators can:
- See an overview of all roles.
- Click on a role to edit its details.
- Add new roles using the Add Role button.
Adding and Editing Roles
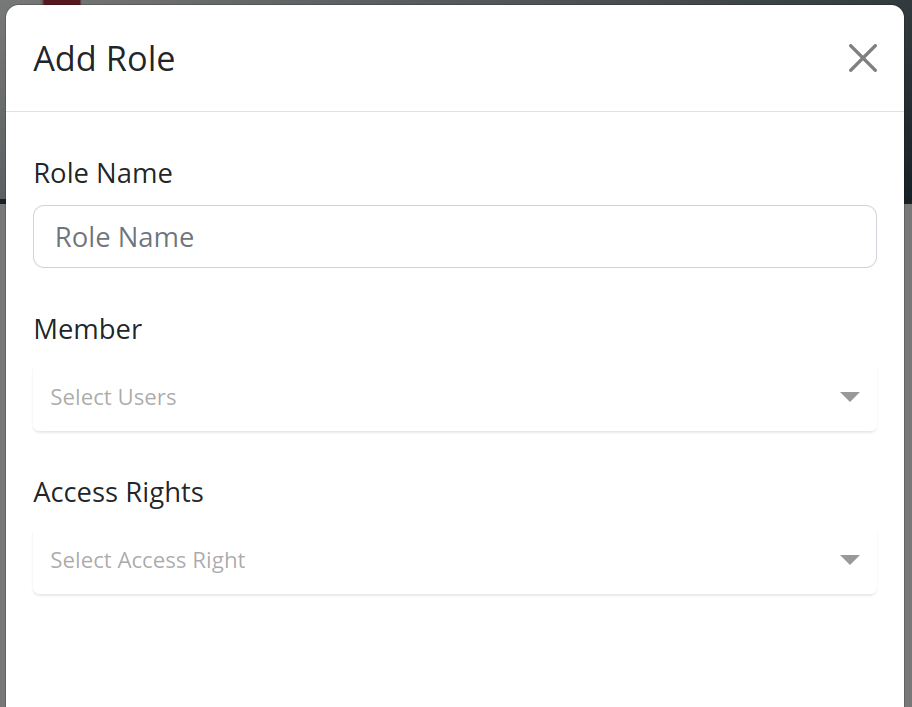
To add a new role or edit an existing role:
- Click on the Add Role button to create a new role, or select an existing role from the list to edit it.
- Configure the access rights using the available options.
- Add or remove members
Configuring Access Rights
When adding or editing a role, the following access rights can be configured:
Access Rights Categories

By properly managing roles and their associated access rights, administrators can ensure that users have appropriate permissions to perform their tasks while maintaining system security and integrity.
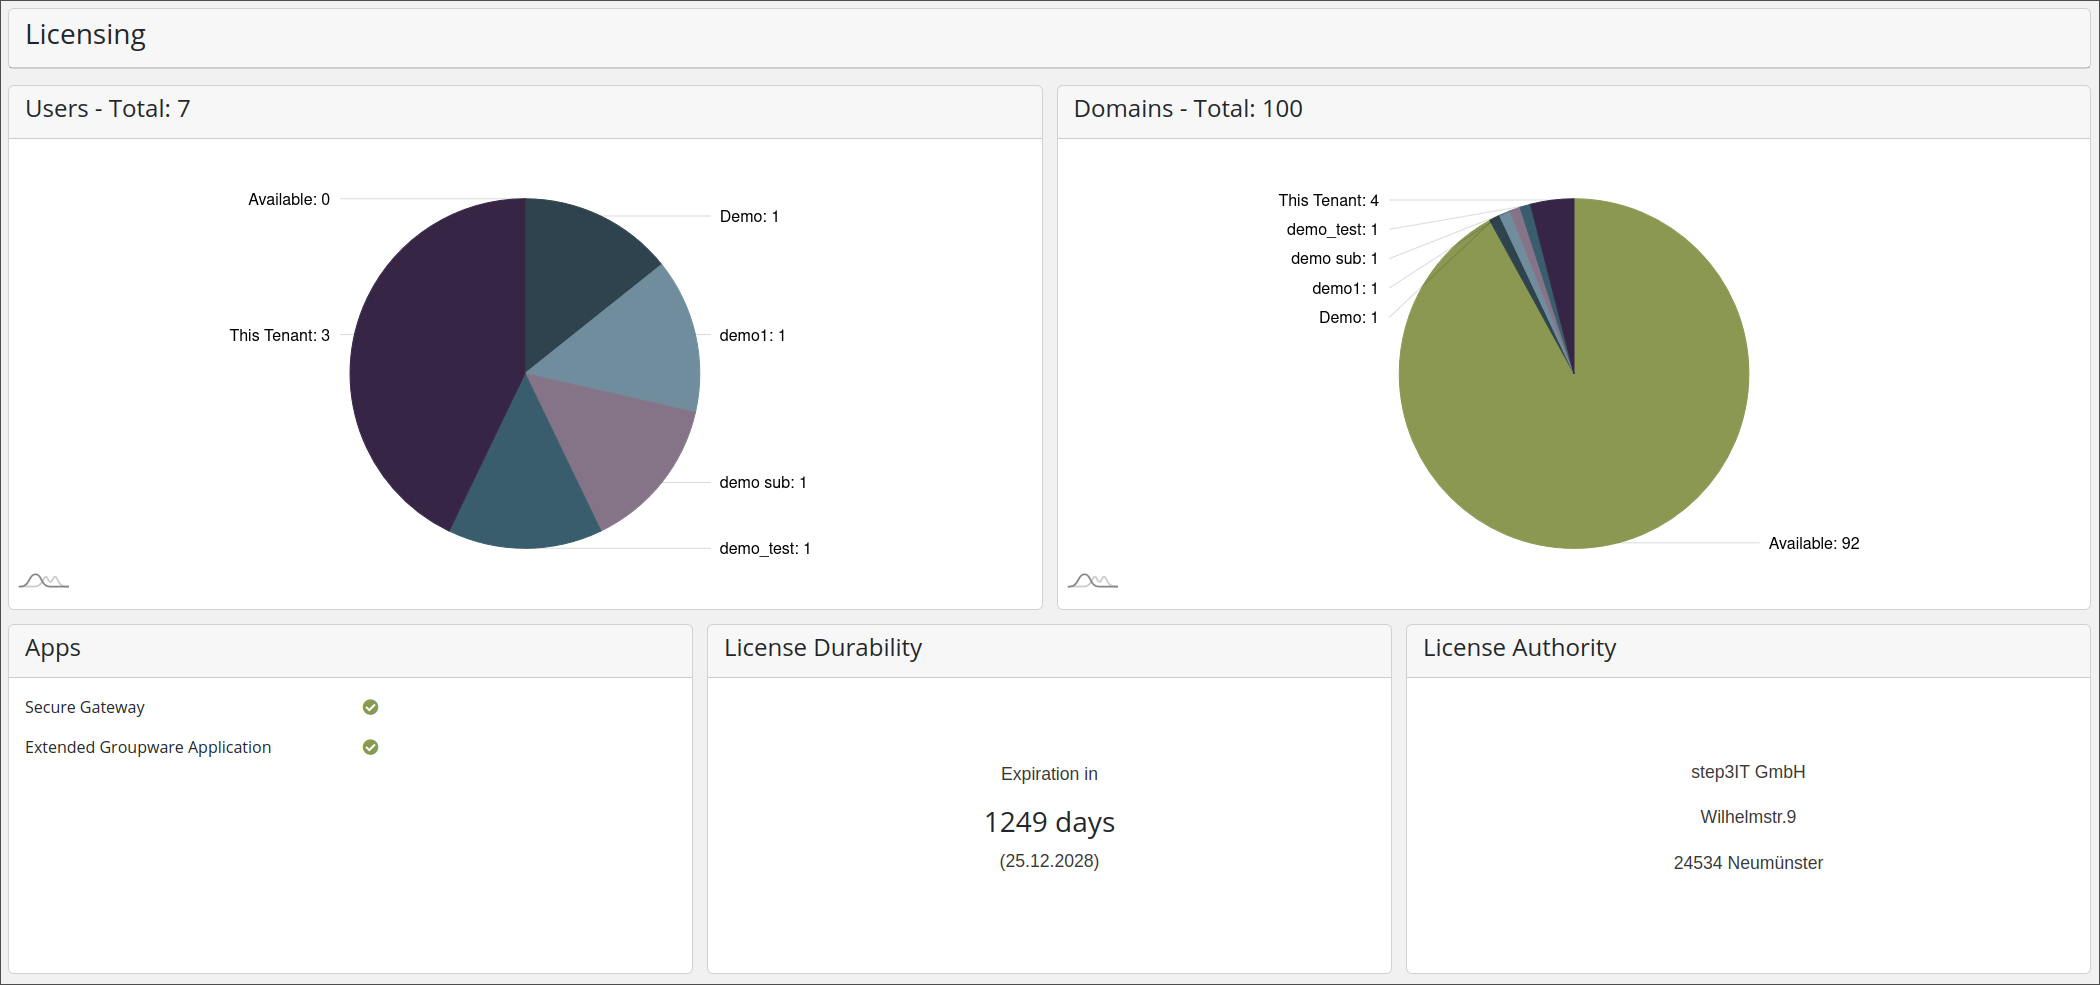
Licenses
The License view shows detailed information about the amount of available resources, domains and mailboxes/users and how these are used. Additionally it shows information about the expiration date, which services can be used and the licensee authority
Mailserver
TLS
If you have a gateway license, you can apply the following settings per target server thorugh mail rules.
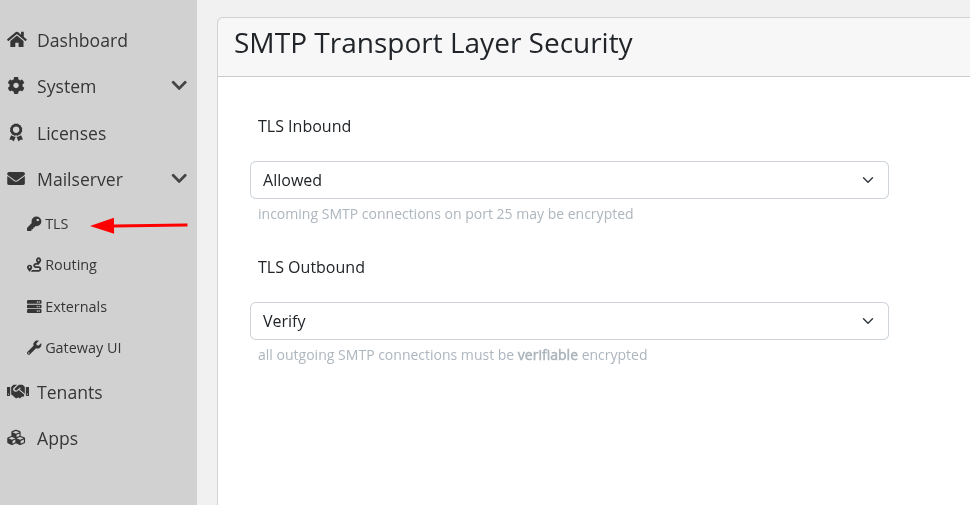
TLS Inbound
- If the TLS configuration for incoming connections is set to
Allowed, TLS encryption is optional.
Connecting clients can upgrade to TLS, but it is not enforced. - If set to
Require, incoming connections must use TLS and will be rejected in the other case.
TLS Outbound
- If you set the TLS configuration for outgoing connections to
Require, these connections must be encrypted via TLS, but publicly verifiable certificates are not required. - If you set it to
Verify, certificates must be publicly verifiable.
This significantly increases security but requires the target server to present a valid certificate.
Externals
This view allows you to manage SMTP auth credentials which can be used by external mailservers to authenticate the groupios gateway.
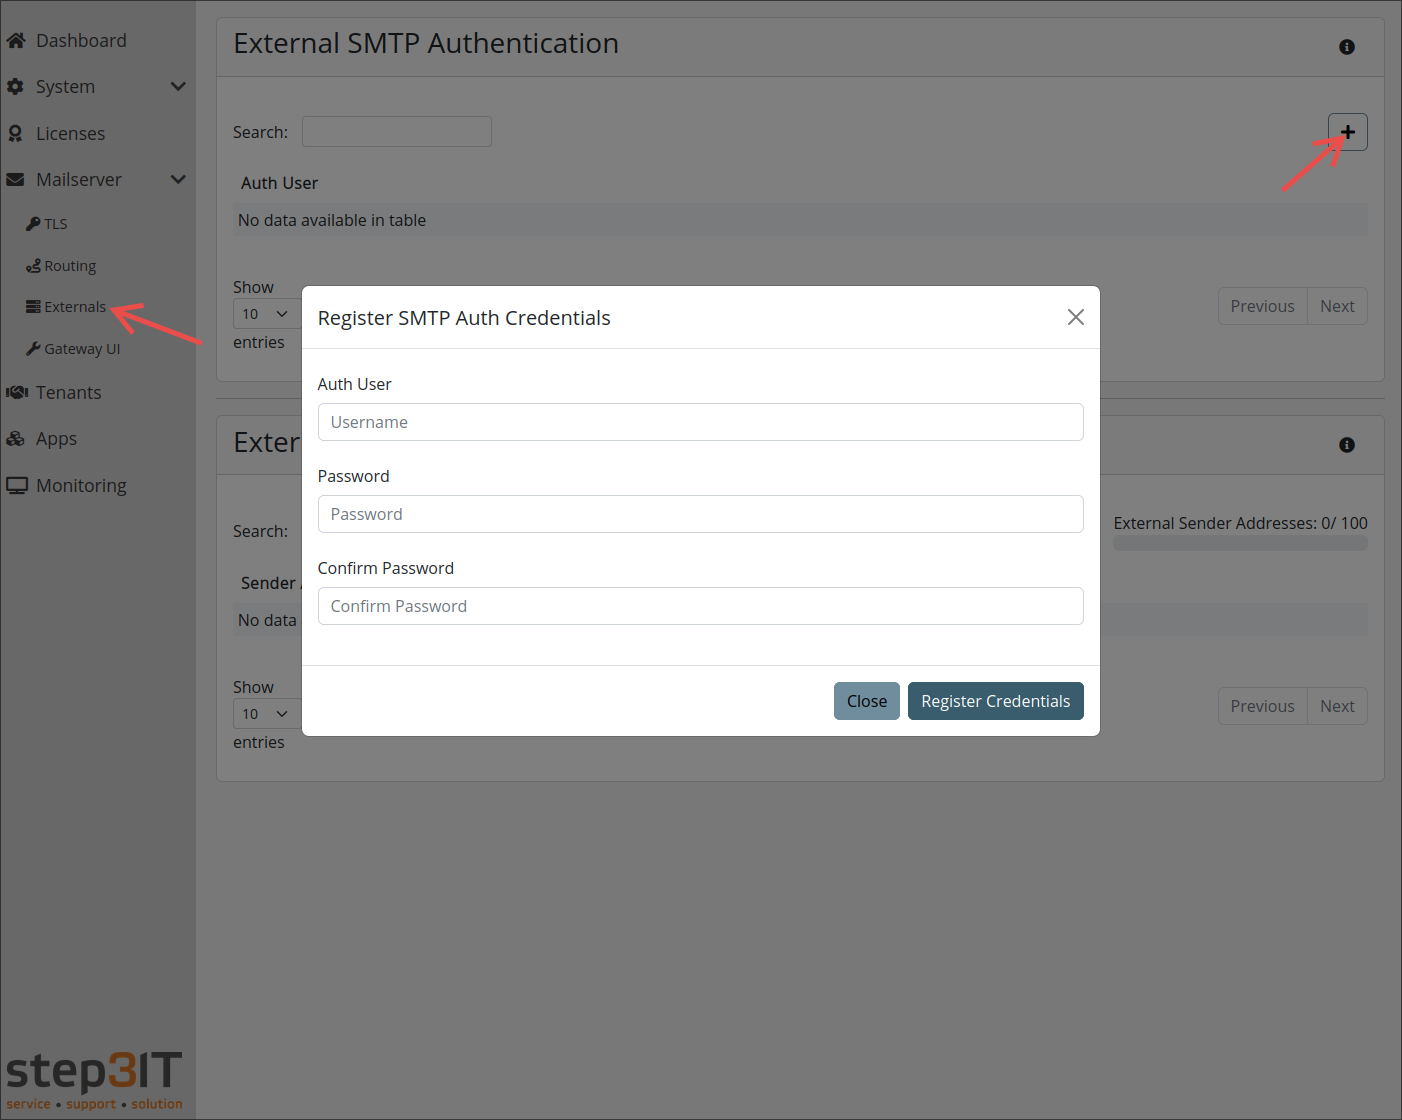
Also, you can see the used sender addresses addresses from these servers.
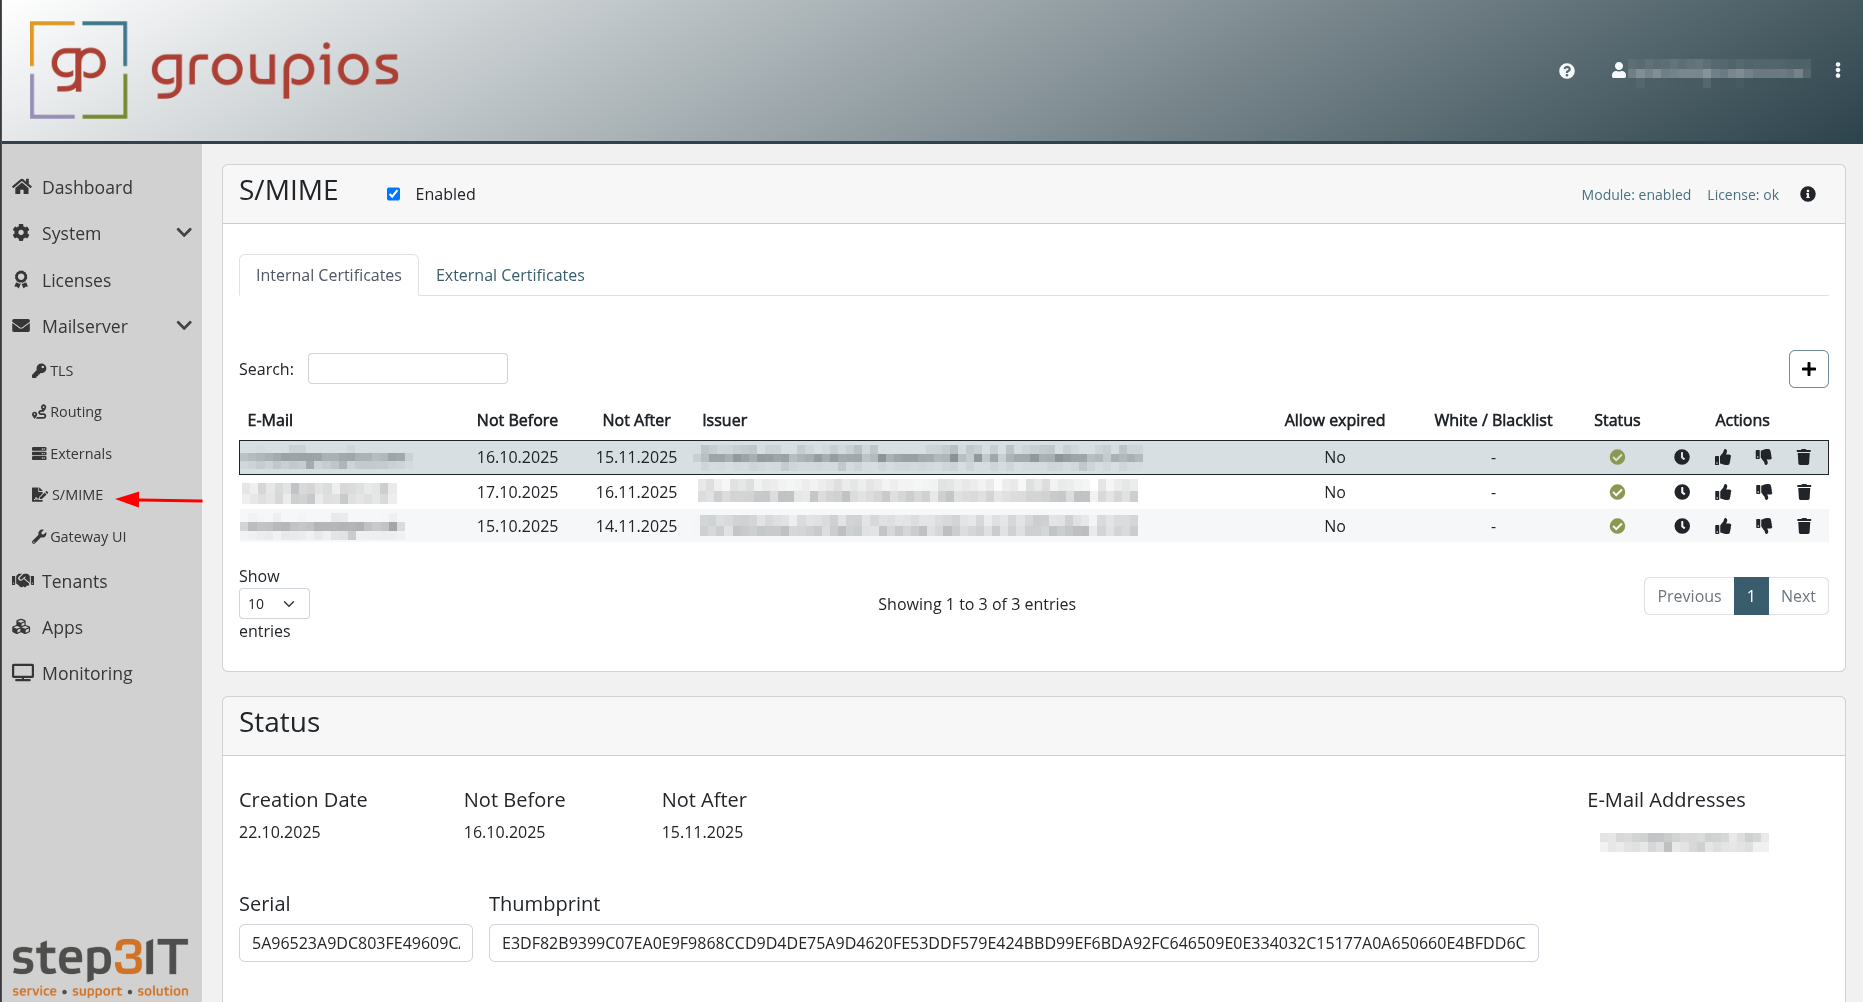
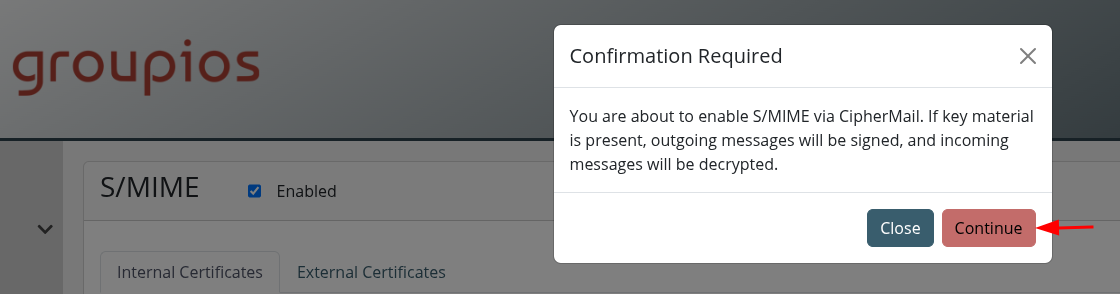
S/MIME
This view allows you to manage S/MIME encryption, decryption, signing and verification.
Note
You need to install CipherMail to groupios to use this feature. Read this section.
 .
.
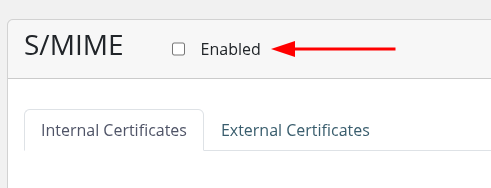
Enable / Disable Module
Right after the installation, the module is still disabled and does not receive mail traffic.
Enable it by clicking the checkbox on the top left and confirm the dialog.
 .
.
 .
.
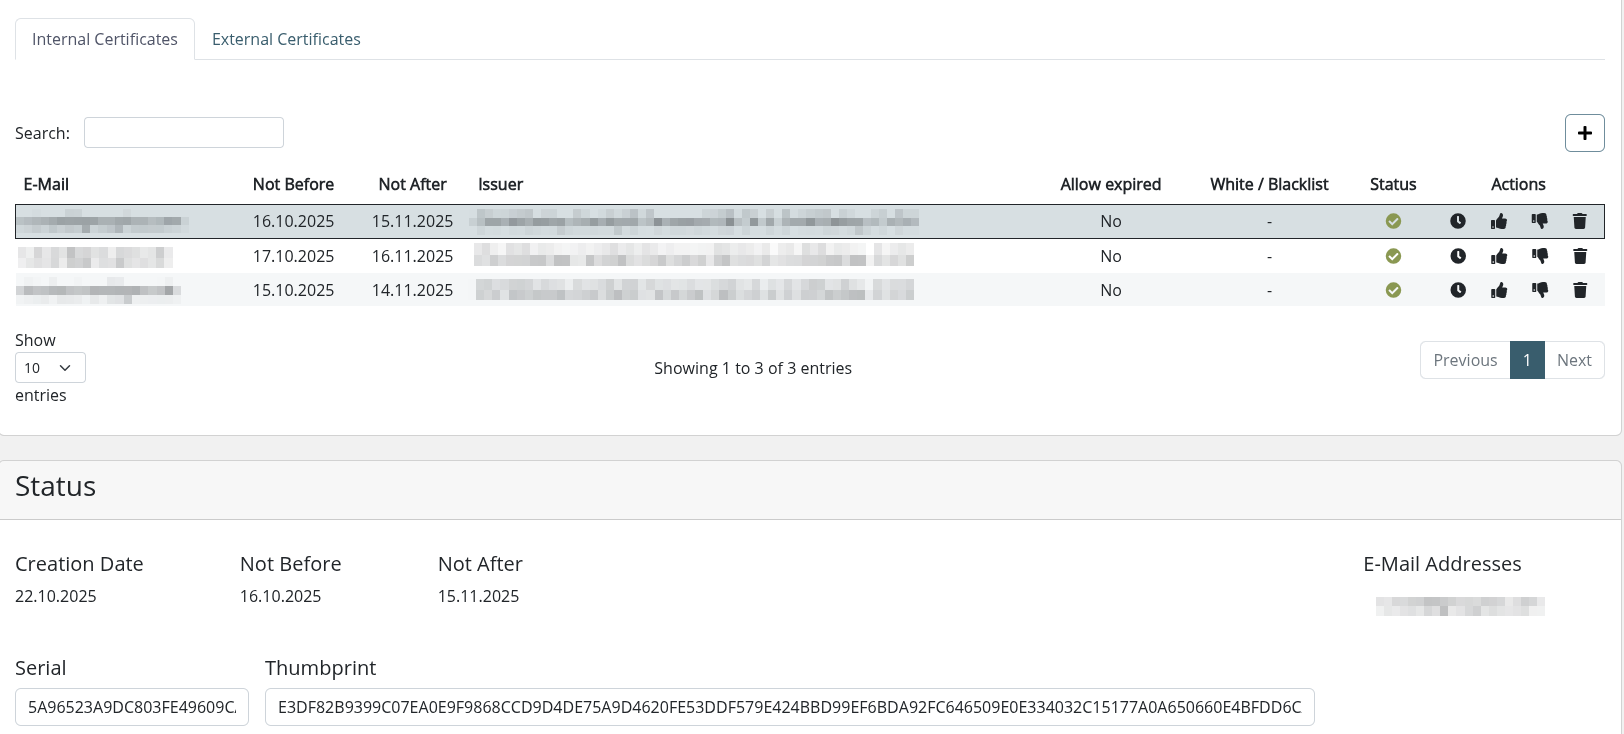
Internal Certificates
Internal certificates contain key material for your users.
They are used to decrypt incoming messages and sign outgoing messages.
 .
.
If an internal certificate with key material is configured for john.doe@example.com, any mail sent by this user will be signed automatically.
Recipients receive the public key and can encrypt messages for john.doe@example.com.
Encrypted replies are automatically decrypted.
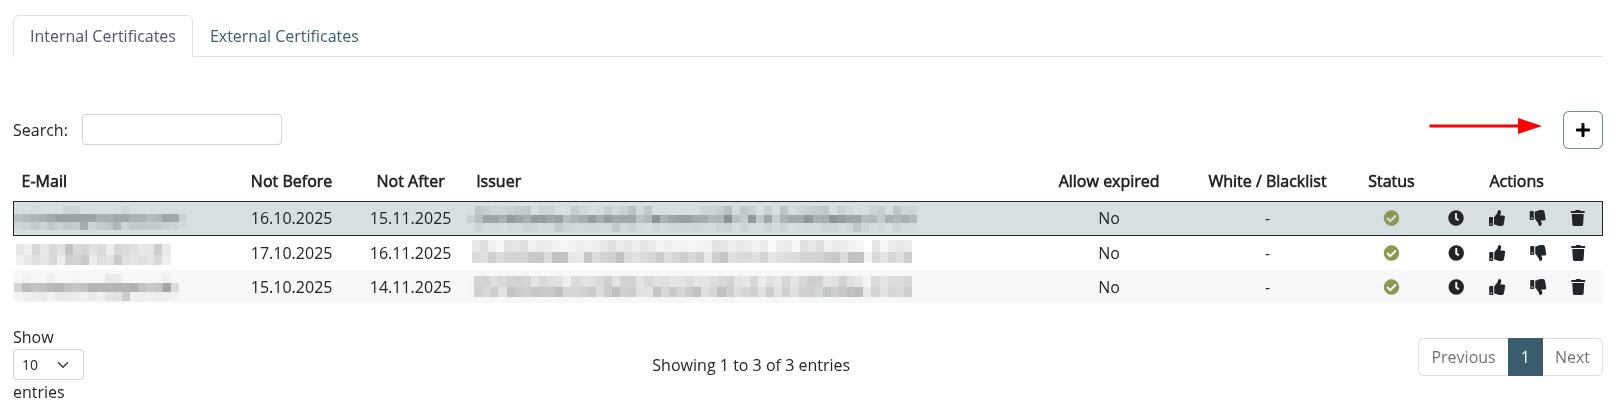
Upload Certificate & Key Material
You can upload .p12 files containing certificate(s) and related key material by clicking the + button on the top right:
 .
.
Note
Users can upload their own key material on their own. Read this link for further information.
External Certificates
External certificates are automatically collected from incoming mail and do not contain key material.
If a communication partner provides a valid S/MIME certificate, it is stored for later use.
This enables signature verification and encryption of outgoing messages per recipient.
For example, if you receive an email from sales@company.com containing a valid S/MIME certificate, it is stored automatically.
If the email is signed, the certificate is used to verify the signature.
Subsequent emails sent by any of your users to this address will be encrypted automatically.
Upload Certificate
You can also manually upload certificates by clicking the + button on the top right as shown for internal certificates.
Whitelist
By default, unverified certificates are not used.
You can change this by whitelisting a certificate, allowing its use in cryptographic operations.
This is useful, for example, when using self-signed certificates.
Allow expired
Even a whitelisted certificate is not used if it is expired.
This feature allows you to change that behavior.
When enabled, the certificate is also implicitly whitelisted.
Blacklist
The blacklist feature prevents the use of a certificate, even if it is valid.
This is useful for excluding captured external certificates that should not be used.
Gateway UI
This links to the Secure Gateway Interface.
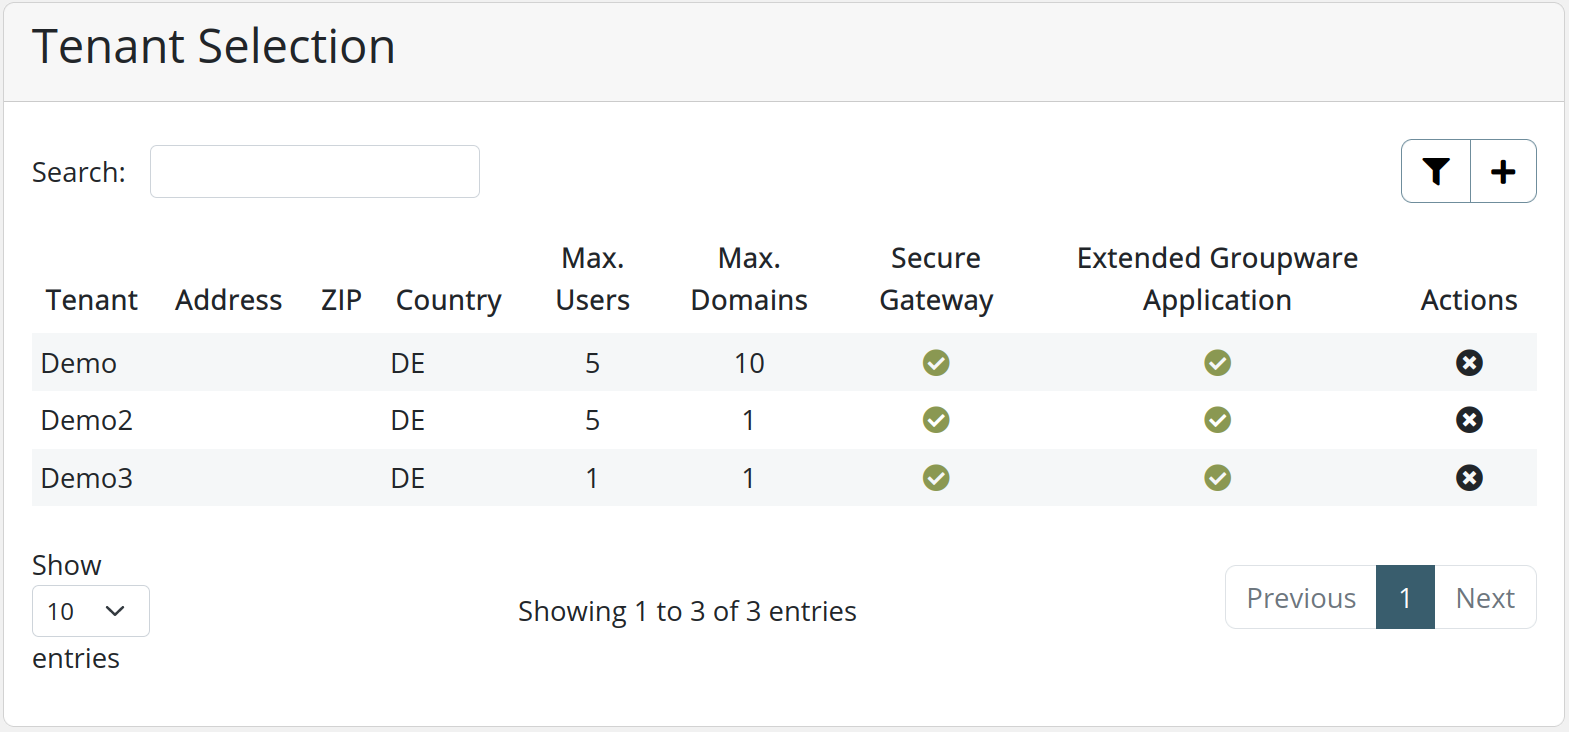
Tenants
The Tenants view provides an overview over all immediate subtenants of the current tenants. In the following we outline how tenants are created, edited and resources managed.
Tenant Overview
The tenant table gives a quick overview over all created tenants and the assigned resources.
Create a new Tenant
When creating a new tenant a default domain must be assigned to the new tenant and license resources must be assigned. After the tenant has been created an administrator will be created under the new using the default domain. This account can then be further used to manage the tenant, e.g. create new domains, users, subtenants.
Note
The tenant default domain must not already be used in the current domain, i.e. appear under "System -> Domains"
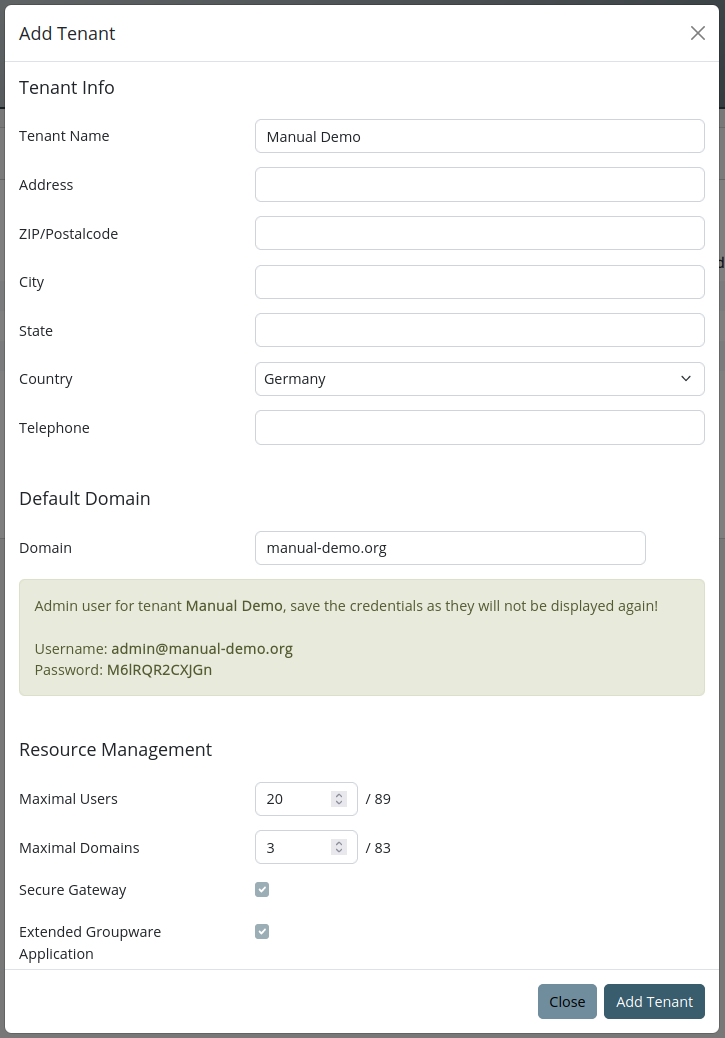
View/Edit Tenant Details and Manage Resources
By clicking a tenant in the tenant overview, multiple cards appear below the table. This include:
- Information: The administrator can add and edit additional information about the tenant here
- Domains: All domains used by this tenant are listed here
- Resource Management: The amount of maximal users and domains can be edited here.

Apps
The apps view allows each tenant to set a domain for groupios Webmail

Monitoring
The monitoring dashboard in groupios offers administrators a clear overview of system performance metrics. At a glance, the dashboard displays real-time statistics for CPU and RAM usage, showing current utilization percentages and historical trends. Load averages provide insight into overall system demand, while a detailed breakdown of filesystem usage highlights available versus occupied space across mounted drives.
Monitoring is provided through a combination of Prometheus and the exporters cadvisor and node-exporter. As a result, the monitoring stats shown in the groupios management interface only scratch the surface of all reported metrics. For full system monitoring we highly recommend using a dedicated monitoring solution. Through the usage of Prometheus Federation all metrics can be scraped from the Prometheus instance running in groupios, see for example https://www.zabbix.com/documentation/current/en/manual/config/items/itemtypes/prometheus.
To test the monitoring federation is working simply execute curl -G http://127.0.0.1:9090/federate --data-urlencode 'match[]={__name__=~".+"}' -v from the command line interface to retrieve all metrics.
Note
For security reasons, Prometheus only listens on the IP 127.0.0.1. Consequently, to access the federation an SSH Tunnel must be setup. Alternatively, you could add a docker compose definition and change the listing IP.
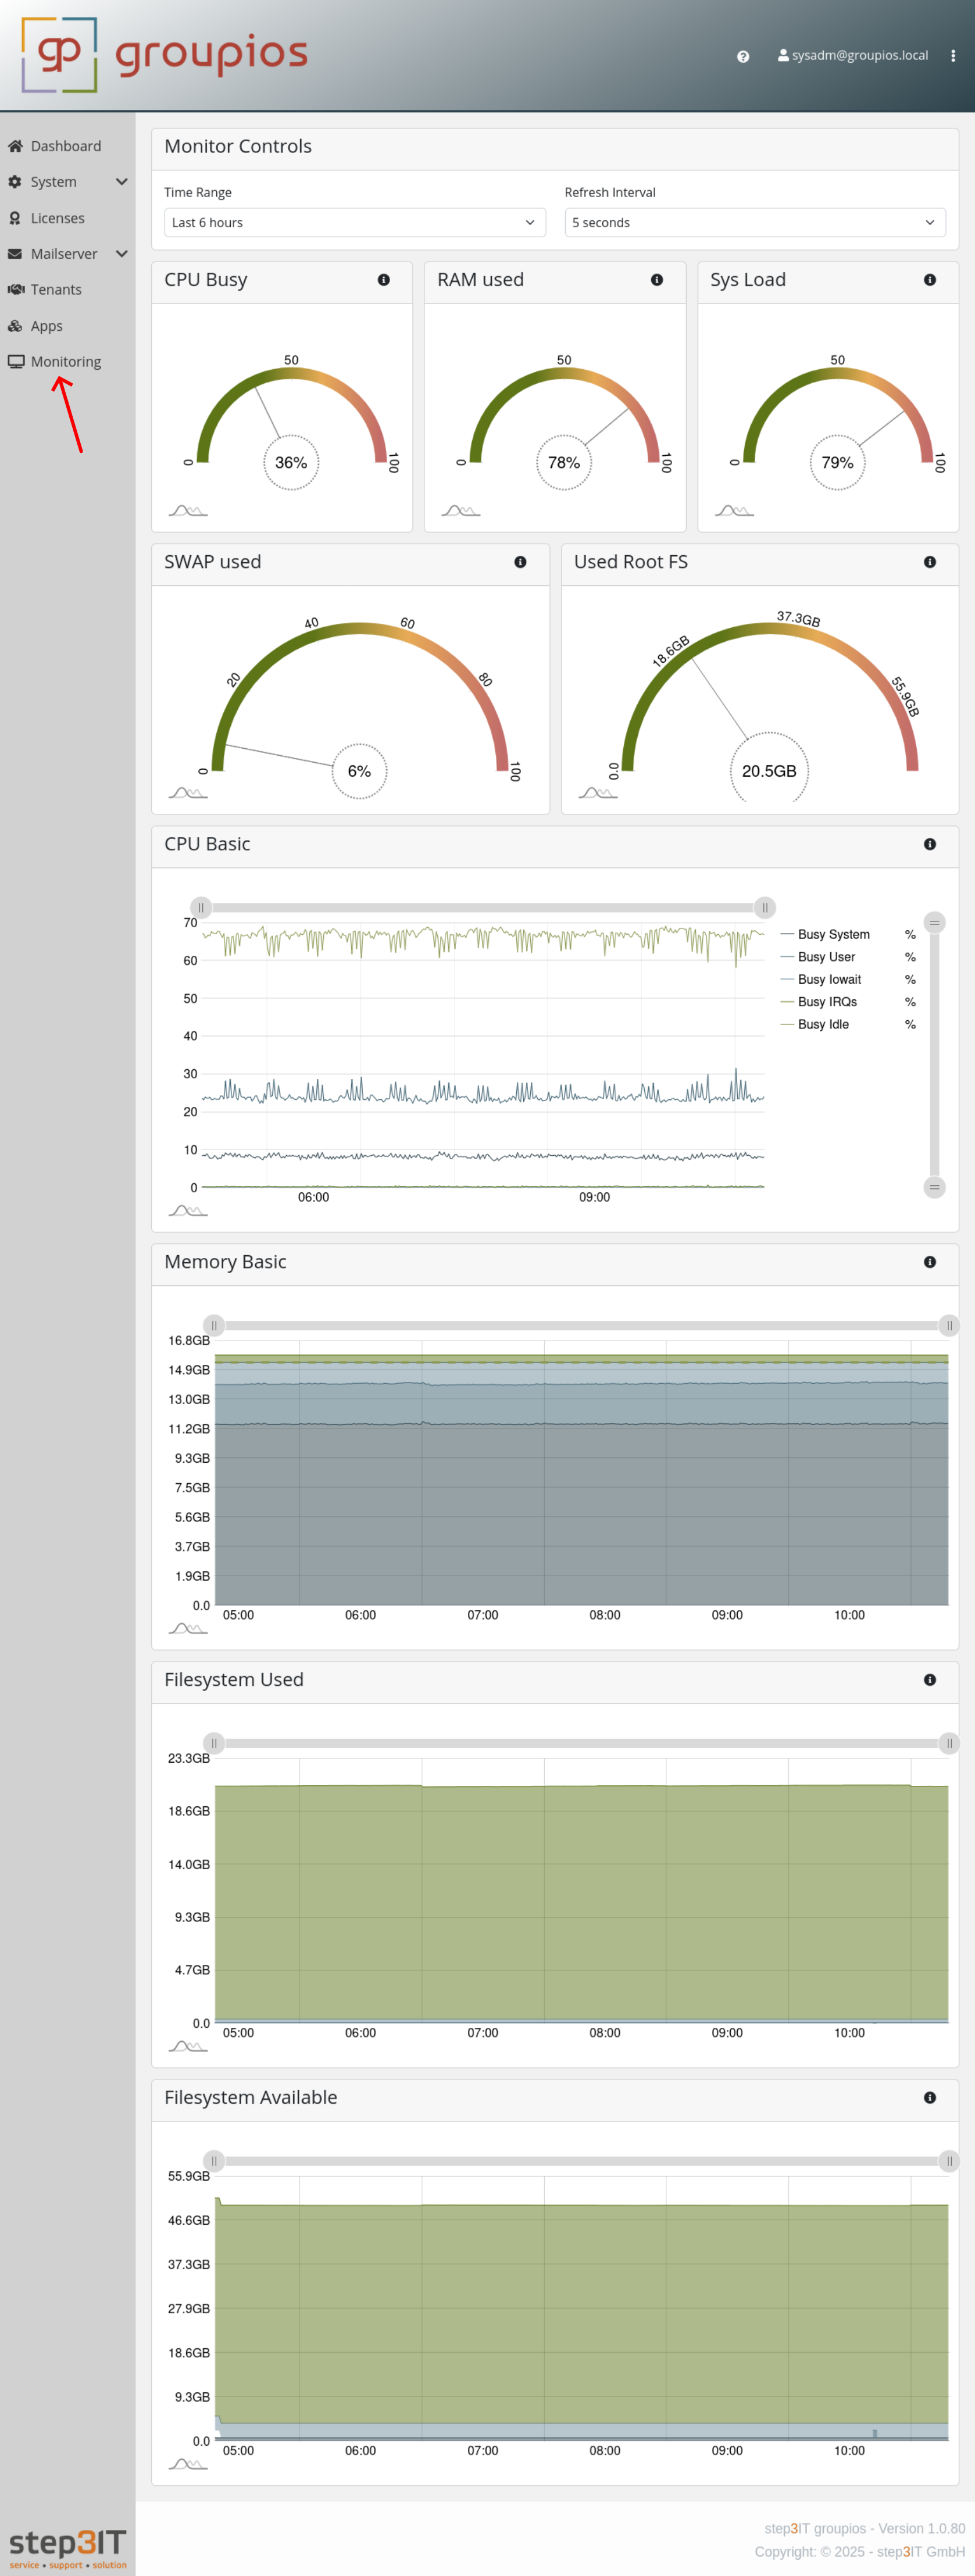
When workers are connected to the system, they are automatically monitored and their stats can be selected in the monitoring view.
